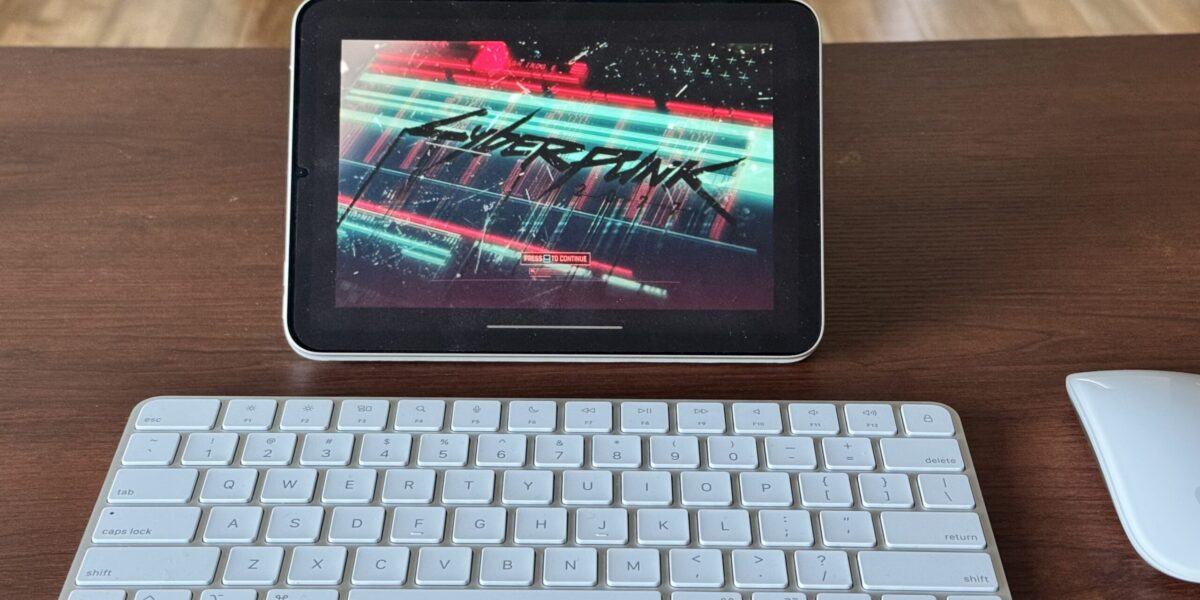
Featured Image: 6th Generation iPad Mini running Cyberpunk 2077 over Moonlight
Here’s how to configure your Ubuntu 24.04 LTS computer for high framerate Moonlight streaming. This can be comfortable as a general remote desktop work, FPS gaming, or working with 3D graphics than SteamLink. For me, this was great for space saving and noise isolation since my host PC can now go in the closet with my networking gear.
This guide comes with a few caveats:
- This is an unusual setup and is not meant for beginners.
- I’ve had both Sunshine and Moonlight trigger kernel panics from not configuring them properly.
- This setup might open you up to vulnerabilities—the uinput configuration bothers me a little. If you have a relatively secure home network and a trusted computing setup you may be fine.
- You must keep the host on a wired connection. If your host computer is on wifi, consider this setup a non-starter. Clients may be wireless, however.
- I am able to get this to work over long distances with Tailscale, but it introduces instability issues that sometimes cause games and applications to crash (perhaps because of how NvFBC works or the MTU over VPN.)
This guide was compiled and verified using the following hardware:
- NVIDIA GeForce RTX 4060 Ti
- AMD Ryzen 7 7700 8-Core Processor
- MikroTik 8-port Cloud Core Router, and a wired gigabit ethernet connection for the host PC
- Generic Netgear router that’s being used in a WAP configuration for my wireless clients
The following software works flawlessly:
- OS: Vanilla Ubuntu 24.04.1 LTS
- Display Manager: GDM3
- Applications: Cyberpunk 2077, Doom Eternal, Blender, Spotify, VSCode
- WM: Wayland/GNOME desktop, xfce4.
- Initialization: gdm3 or manually starting X.
It works with Moonlight clients on the latest versions of iOS, iPadOS, Ubuntu, Windows, and MacOS.
Similar Guides and Setups
- Remote SSH Headless Sunshine Setup. This is a very good guide that uses a more manual setup for Xorg. I didn’t know about this guide when I first started, but I might have considered doing things this way instead. My guide diverges in subtle ways and favors a vanilla Wayland setup.
- Headless SteamLink setup using a docker container. This will use SteamLink instead of Sunshine + Moonlight, which requires fewer configuration setups and might be more accessible.
Overview
We’ll first make sure we’re not accidentally running from onboard Graphics. Then we set up a dummy 4K display to give us a large framebuffer to work with, adjust permissions for uinput to get keyboard and mouse control, and finally we optimize Sunshine for low-latency, high-FPS streaming.
Step 1: Set NVIDIA as the Primary GPU to Disable AMD iGPU Rendering
This will ensure you’re using your NVIDIA card to render instead of onboard graphics. By default, Ubuntu may be using the AMD integrated graphics when no monitor is attached to the NVIDIA card. First, install the NVIDIA driver if you haven’t done so already:
sudo apt install nvidia-driver-535We need to force the system to favor the NVIDIA GPU for all rendering:
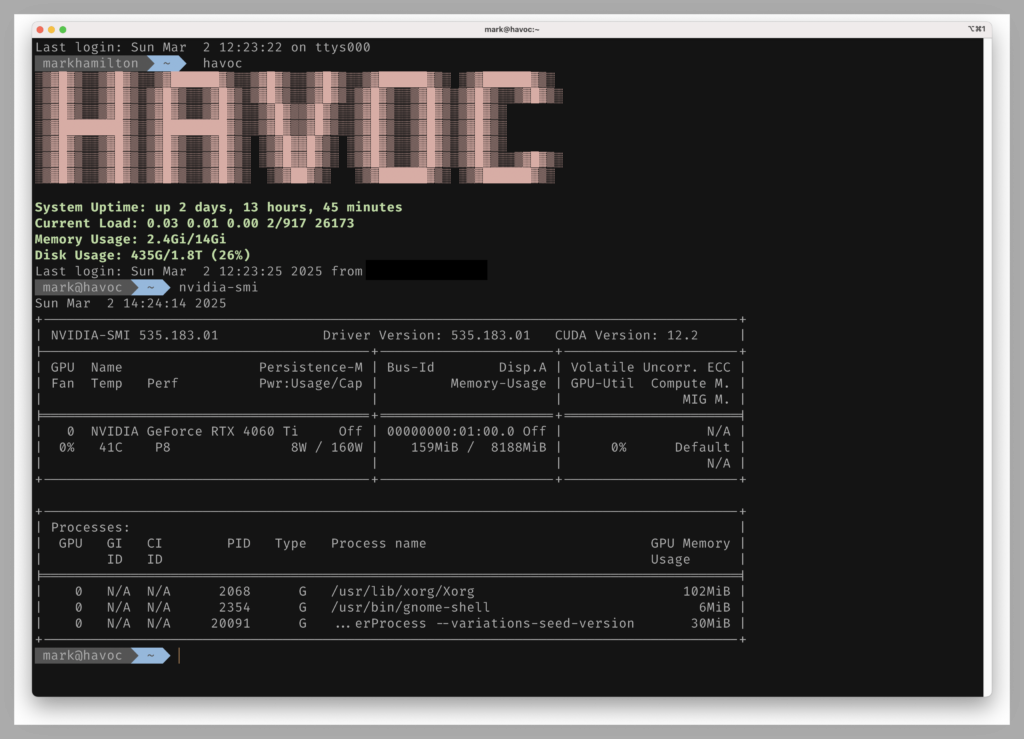
sudo prime-select nvidiaNow your system should prefer the NVIDIA GPU. You can verify by running nvidia-smi or glxinfo | grep OpenGL. Proceed once NVIDIA is confirmed as the active renderer.
Step 2: Create a Dummy 4K@120Hz Display
The next step is to spoof a display being attached to your NVIDIA card. A lot of people online suggest using the software dummy display driver in X11. For performance sake, do not do this! You can easily get a dummy plug for your monitor, or just feed a custom EDID to the NVIDIA driver, tricking it into thinking a 4K 120Hz display is connected. Here’s how to do it the dongle-free way:
- Obtain a 4K120 EDID File. EDID files describe a monitor’s capabilities. You have a few options:
- Use a pre-made EDID from an EDID repository. For example, the Linux TV EDID repository contains files for various displays. One known EDID that supports 4K@120Hz and HDR is from the Samsung Q800T (HDMI 2.1) TV.
- Extract EDID from a real monitor/TV (if you have one that supports the target modes) using
nvidia-settingson a system where that display is connected and save it in your X11 folder (e.g.,/etc/X11/4k120.edid.) - Use this Virtual Display Driver Wizard to make a custom one if you’re on Windows.
- Xorg Configuration – Fake a Monitor. Create or edit your Xorg configuration at
/etc/X11/xorg.confto use the EDID on one of your card’s outputs. It’s a good idea to backup your Xorg config first. Here’s mine:
Section "ServerLayout"
    Identifier     "Layout0"
    Screen      0  "Screen0" 0 0
    InputDevice    "Keyboard0" "CoreKeyboard"
    InputDevice    "Mouse0" "CorePointer"
EndSection

Section "InputDevice"
    Identifier     "Mouse0"
    Driver         "mouse"
    Option         "Protocol" "auto"
    Option         "Device" "/dev/psaux"
    Option         "Emulate3Buttons" "no"
    Option         "ZAxisMapping" "4 5"
EndSection

Section "InputDevice"
    Identifier     "Keyboard0"
    Driver         "kbd"
EndSection

Section "Device"
    Identifier "NvidiaCard"
    Driver "nvidia"
    BusID "PCI:01:0:0"
    Option "ConnectedMonitor" "DFP-0"
    Option "CustomEDID" "DFP-0:/etc/X11/4k120.edid"
    Option "AllowEmptyInitialConfiguration" "true"
EndSection

Section "Screen"
    Identifier "Screen0"
    Device "NvidiaCard"
    Monitor "DummyMonitor"
    DefaultDepth 24
    SubSection "Display"
        Depth 24
        Virtual 3840 2160
    EndSubSection
EndSection

Section "Monitor"
    Identifier "DummyMonitor"
    HorizSync 28.0-160.0
    VertRefresh 24.0-120.0
    Modeline "3840x2160_60.00" 533.25 3840 4072 4488 5136 2160 2163 2168 2222 -hsync +vsync
EndSection
The Breakdown:
BusIDshould match your NVIDIA GPU (find it vialspci | grep -i NVIDIA). This ensures X ties the config to the NVIDIA card. Use the same notation that I’m using above, with colons instead of dots.Option "ConnectedMonitor" "DFP-0"tells the NVIDIA driver to pretend a digital display is connected on the first output.Option "CustomEDID"points to the EDID file that we used earlier. This makes the driver load the given EDID instead of relying on a physical monitor. The EDID file will offer resolutions/refresh rates from that EDID as if a real monitor is attached. if you do not have a monitor, fake or otherwise, your framebuffer will be stuck at an unusably small size, like 8×8 or 640×480.- We include
Virtual 3840 2160under the Display sub-section to set an initial framebuffer size of 4K. This allocates a screen large enough for 4K. The EDID should take care of available modes; this just ensures X can accommodate it. You could also setVirtual 7680 4320if using an 8K EDID. - The Monitor section sets an identifier and broad sync ranges covering up to 120 Hz. This might not be strictly necessary if the EDID is present since that will provide its own ranges and modelines, but it doesn’t hurt to include safe values.
- The
AllowEmptyInitialConfigurationoption lets X start even with no real monitor attached. We’ve already marked the NVIDIA as primary, so this is just an extra safety to let X initialize headlessly.
Let’s Continue…
- Reload and Test X: Reboot the system (or restart the X server with
sudo systemctl restart gdm3). After reboot, Xorg should start using the dummy display. You can verify by checking/var/log/Xorg.0.logfor lines indicating the EDID was loaded and modes registered. Also, runningxrandrinside the X session should show a display with resolutions including 3840×2160@120 and 1920×1080@60, assuming those were in the EDID.
If you run xrandr and you get a message like, “Can’t open display” then try the following:
export DISPLAY=:0
xrandr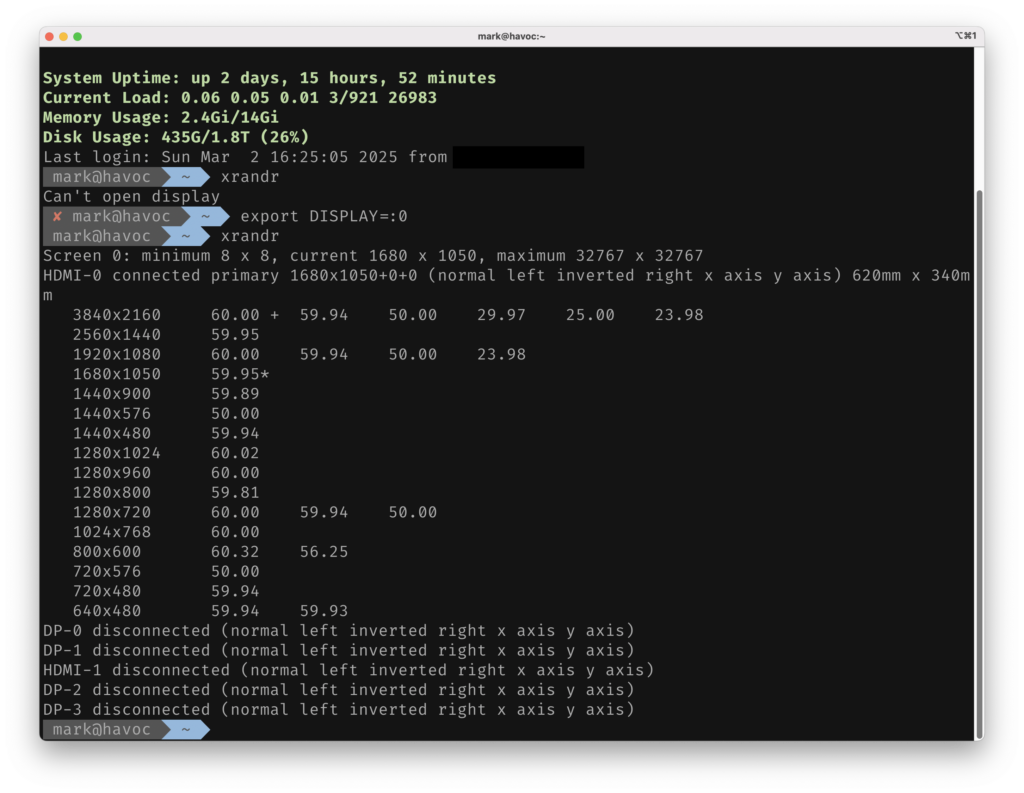
At this point, we have a virtual monitor attached to the NVIDIA GPU. This gives us a real X screen running at high resolution and refresh rate, which Sunshine can capture and stream. The X11 “dummy driver” solution is avoided; instead, the NVIDIA driver is doing the rendering using full hardware acceleration.
Step 3: Update Permissions for Uinput
We’re almost ready to install and run Sunshine, but first we have to update permissions for uinput so that we’re able to get mouse and keyboard inputs. If you do not do this, your mouse and keyboard will not work. On the host computer run this command:
sudo chown $(id -un):$(id -gn) /dev/uinputThis will persist until a reboot happens. There are a few good reasons to not do things this way—mainly that it gives every application full access to your keyboard and mouse inputs. Limiting this to your sunshine sessions might be preferable, so I’ll refer back to this article for a better setup script. (Check out the Uinput Permissions Workaround section.)
Step 4: Install Sunshine. Then Optimize it for Low-Latency, High-FPS Streaming
Grab the Latest Release of Sunshine from their Github release page. If you are downloading the debian package, install it this way:
sudo dpkg -i release_file_name.debSunshine is the game-streaming host that will capture the host desktop and stream to Moonlight clients. To achieve resolutions as high as 4K 120 FPS with low latency, we need to tune Sunshine’s capture and encoding settings:
- Prefer NVIDIA’s NvENC for Encoding: Sunshine should automatically use NvENC (NVIDIA’s hardware video encoder) given you have an NVIDIA GPU. Ensure in Sunshine’s settings (Web UI under Video > Encoder) that NvENC is selected as the encoder.
- Use the Low-Latency NvENC Preset: NVIDIA’s encoder has presets balancing quality vs latency. For minimal delay, choose the “Low Latency High Performance” preset. This preset reduces buffering and disables most extra B-frames, trading some image quality for latency. If you want a bit more quality and your system can handle it, “Low Latency High Quality” is another option, but start with High Performance for fastest response. In Sunshine’s config, set:
- NvENC Preset: LowLatencyHighPerformance (often labeled “llhp”)
- Rate Control: CBR (Constant Bitrate) – this helps keep frame delivery steady, which is important for smooth streaming.
- Max Bitrate: Set a high bitrate appropriate for your network (for 4K 120fps, this could be 100 Mbps or more if your network can handle it, or lower for 1080p60). Ensure both Sunshine and Moonlight are set to the same or compatible bitrates.
- Choose the Right Capture Method: Sunshine supports several capture backends. In order of performance on NVIDIA: NvFBC, KMS, then X11. By default, Sunshine will use the first available method in its priority list.
- NvFBC (NVIDIA Framebuffer Capture) is very fast. This will capture frames directly from the NVIDIA GPU’s output.
- KMS (Kernel Mode Setting capture) is another high-performance method, especially if you were running a Wayland session, need HDR, and NvFBC isn’t working for you. If Sunshine falls back to X11 or you want to force KMS:
- Enable KMS access:
sudo setcap cap_sys_admin+ep $(which sunshine)to give Sunshine the capability to use DRM capture (this avoids having to run Sunshine as root). - In Sunshine’s config, set
capture = kmsto force KMS. Keep in mind KMS capture might not work if a standard X11 session is active.
- Enable KMS access:
- X11 Capture is the slowest and should be avoided if possible. It comes with latency and CPU penalties.
- Sunshine Frame Rate and Resolution: In Sunshine’s configuration (Application or desktop streaming settings), set the host resolution and FPS to the desired values:
- For 4K @ 120 Hz streaming, set host resolution to 3840×2160 and FPS to 120 in the Sunshine stream settings. Make sure your client and network can handle the high bandwidth.
- For 1080p @ 60, you may either downscale on the client side or set Sunshine to stream at 1080p60 directly. Keep in mind Sunshine will dynamically switch if you launch a game in a different resolution.
- You can change desktop resolution the way you normally would in your display settings, and the client will handle resolution switching automatically.
- NvENC Rate Control and Quality: Experiment with your network. Use CBR and set a high bitrate or stick to VBR. You may also adjust QP (quantization parameter) or other advanced settings in Sunshine’s “Advanced” tab:
- A lower QP value means less compression (better quality, more bitrate). Sunshine’s default might be fine, but if you have headroom, you can set a fixed QP (e.g., 20 or lower) or use CBR with a high bitrate to maintain quality.
- No V-Sync: Make sure the game/app you stream isn’t artificially capped at low FPS by V-sync. Run games with V-sync off, or use G-Sync/FreeSync so that the GPU can output as many FPS as possible for Sunshine to capture. Sunshine itself will capture as fast as possible up to the set FPS limit.
- Moonlight Client Settings: On the client side (Moonlight), optimize your performance this way:
- Set Moonlight’s stream resolution and FPS to match what you configured on Sunshine (e.g., 4K120 or 1080p60).
- In Moonlight settings, match the bitrate to what you set on Sunshine. If you experience stuttering, you can try Moonlight’s “Prefer Smoothest” streaming mode which may buffer a bit more to smooth out frames. For lowest latency, you typically want to minimize buffering. Balanced or Smoothest can reduce visible stutter at the cost of a few milliseconds latency. Experiment to see what feels best.
- Ensure Moonlight is decoding via hardware.
- Test Latency: For truly low latency, your network needs to be fast and stable (wired Gigabit Ethernet is ideal). Test the setup to gauge latency and smoothness at lower bitrates, then push them up to maximize quality. Turn on the performance overlay (Ctrl+Alt+Shift+S) to show stats like latency, FPS, packet loss, etc. Use that to fine-tune settings. If network is the bottleneck, you might increase Sunshine’s FEC – Forward Error Correction – setting to handle packet loss.
Using the fastest capture method (NvFBC/KMS), and a wired ethernet connection you might be able to achieve < 10 ms of input-to-output latency. Nice!
Some Ideas to Take this a Step Further:
- Set up Sunshine as a service so it’s always running.
- Find a better fix for uinput permissions.
- Get this running over Tailscale as your own private GeForce now server.